Project Update 2026
It’s November 2026!? The last post was in 2021. This blog was meant as a journaling effort… That’s gone well. This project hasn’t exactly progressed as quickly as I would’ve hoped. Nevertheless, progress has been made!
https://www.youtube.com/watch?v=PFvSWWD3wPI
This post was largely written at the start of 2025; it’s apparently taken me this long to publish it. At the time I was more or less there with Motor One: reasonable speed control, position sensing and a basic dialling program, with a few things still to solve or refine before moving on. That’s still accurate, as I stopped working on this part of the project. I do think it’s in a state where, once I resume work in earnest, finishing it will be a matter of weeks or months, not years.
Let’s look back over the key development areas.
Electronic Speed Control (ESC)
A high-level timeline and summary of the ESC’s development, v0 to v4.3.
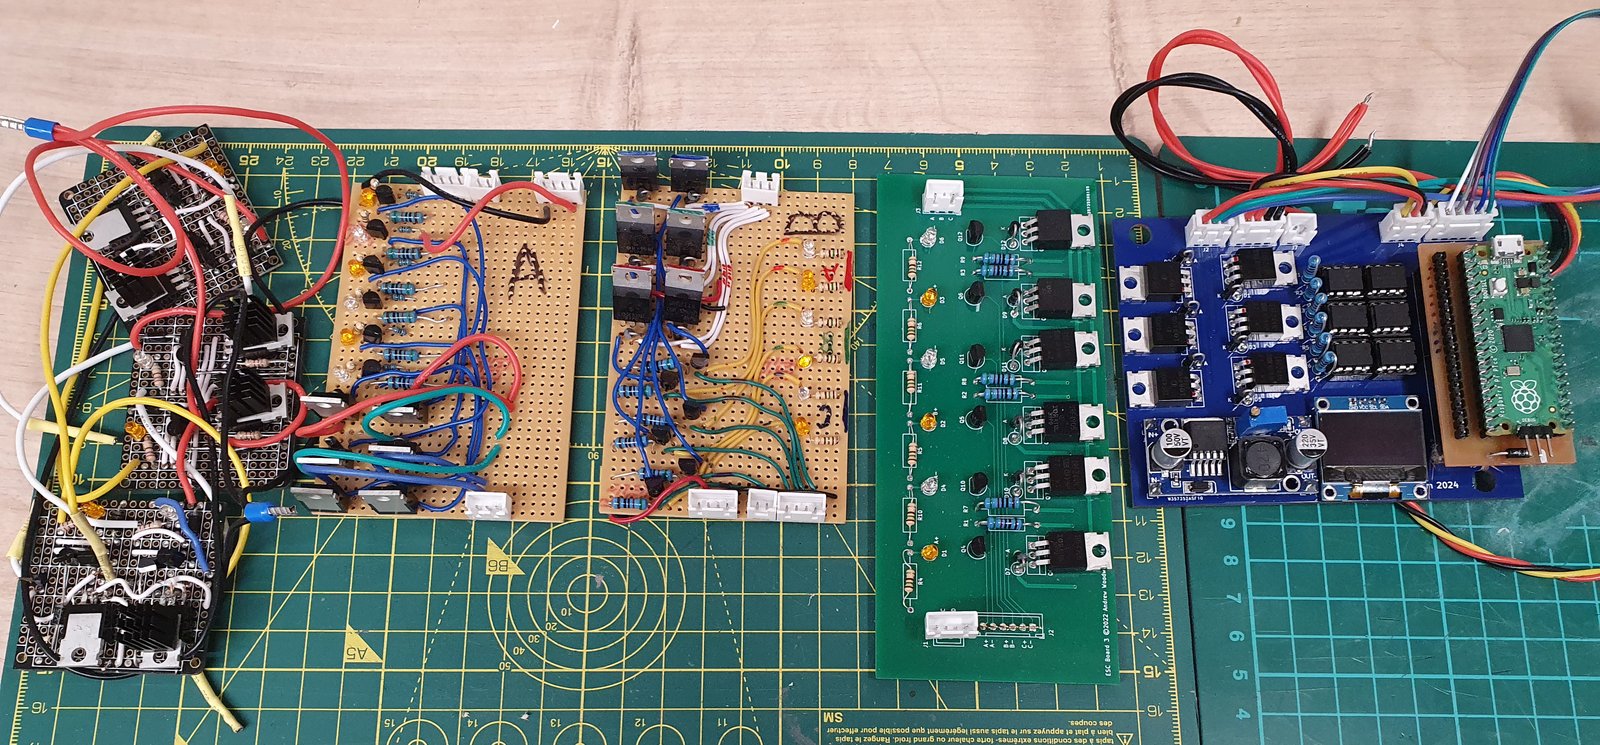
ESC Versions - Left to Right
- v0 - 2021; the original three-board circuit from the Motor One blog post. Used only n-channel MOSFETs. It kind of worked by chance, really: one of the sub-boards was actually dead, so it was running on two phases, and would randomly stall as a result.
- v1 - 2021; a refined design of the original, moving to a single board, switching to n-channel and p-channel MOSFETs for ground and VDD respectively. v1 unfortunately died when at least one of the MOSFETs cooked itself and went short circuit.
- v2 - 2021; an electrically identical replacement for v1, but better laid out on my test jig. The jig introduced active cooling as a stopgap for the overheating problem. Naming is retroactive, originally these were the A and B boards.
- v3 - 2022; first factory-made ESC PCB (PCBWay). It was intended to be the v2 design transcribed into KiCad, but I made a mistake with the MOSFET routing, requiring bodge wire corrections. I never ended up using this version for that reason, and it’s bloody massive. The point of this design was to have a spare in case I burned out the v2. Populating one of these would be easier than another one-off perfboard job.
- v4 - 2024; switches to the Pi Pico from the Arduino Nano I’d been using up until now, integrates the test harness onto a single board (microcontroller power, power breakouts, screen), and solves the MOSFET thermal issues.
- v4.1 - 2024; revision. Fixes flipped SDA/SCL screen connections, corrects MCU board power with a Schottky diode on VSYS. (never produced)
- v4.2 - 2025; revision. Adds buttons for debug control. (never produced)
- v4.3 - 2026; major component and layout revision. Same electrical schematic, but switched to SMD components and added the buttons for on-device debugging. Adds two breakout headers exposing the remaining pins for the LEDs, sound and chevron lock.
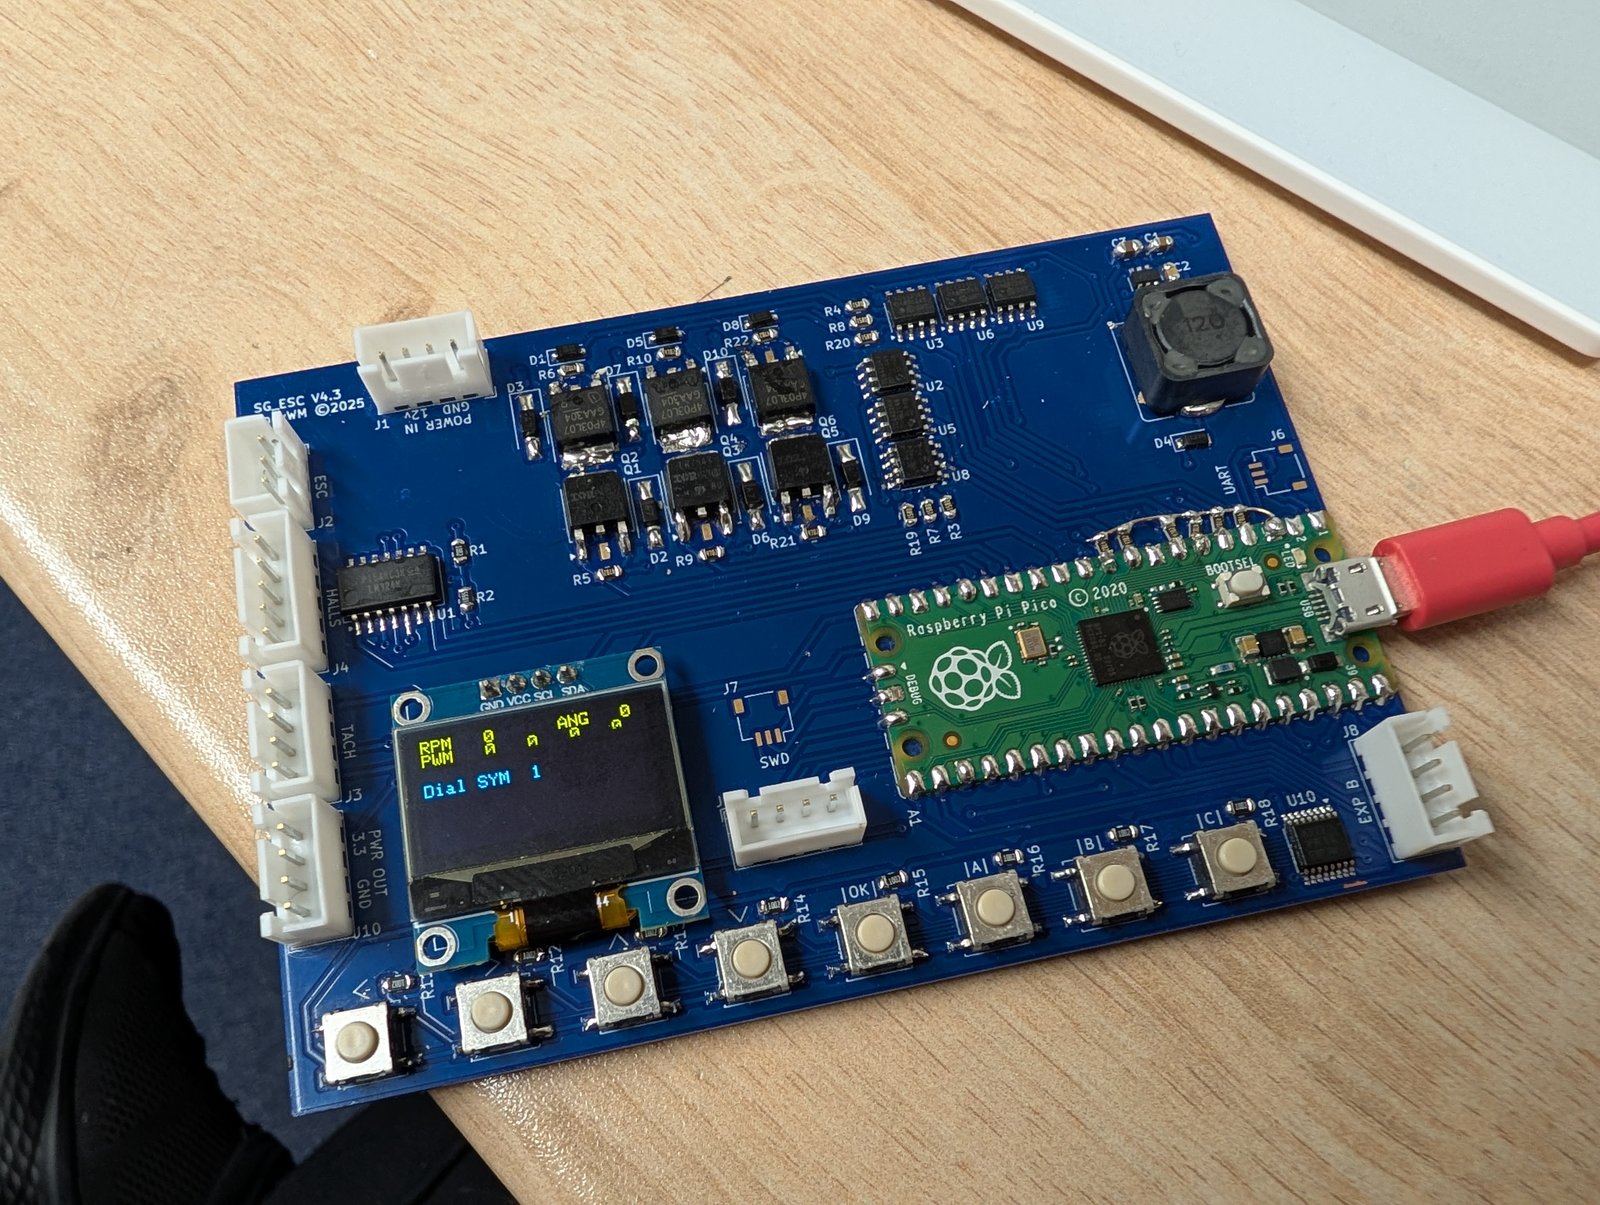
For most of the development I used the v2. Its main problem was the constant risk of overheating and self-destructing. The v4 solves this. The overheating seems to have been caused by my choice of BJTs for switching the MOSFET gates: they’re too slow for this application, which leaves the MOSFETs spending a lot of time between states, with extreme switching losses. Thus heat, thus damage. The proper solution was to use the proper solution: a gate driver IC. The v4 uses TC4420s.
Videos:
- V2 Thermals Test - https://www.youtube.com/watch?v=9gCmHrg-cko
- V4 Spin Test w/o PID, er Walter? - https://www.youtube.com/watch?v=E7jSLSE870U
- V4 Spin Test w/PID - https://www.youtube.com/watch?v=0aqbc3BDW44
- V4 Custom Bearing, er Walter^2 - https://www.youtube.com/watch?v=DldsclZsMhU
While updating the design for the v4, I took the opportunity to switch to the Pi Pico (RP2040) as my MCU, though I’m still using the Arduino core for familiarity’s sake. The RP2040 is a more modern chip, cheaper and faster than the Nano’s Atmega328p. I’d been considering an ESP or STM32-based MCU for the next iteration, but I’d been playing around with a Pico anyway and thought well enough of it to try it out. The v4 had a couple of minor faults, which I have corrected with bodge wires. The I2C connections for the display were flipped; frustratingly, these screens don’t seem to actually be standardised. I’ve had a few now, and the connections seem to swap around randomly. I also needed to add a Schottky diode (recommended by the Pico docs for power management) to stop VBUS (USB, 5V) shorting to VSYS via the ESC’s 3.3V rail.
Software
Here is the control flow diagram for the basic dialler harness controlling the ESC.
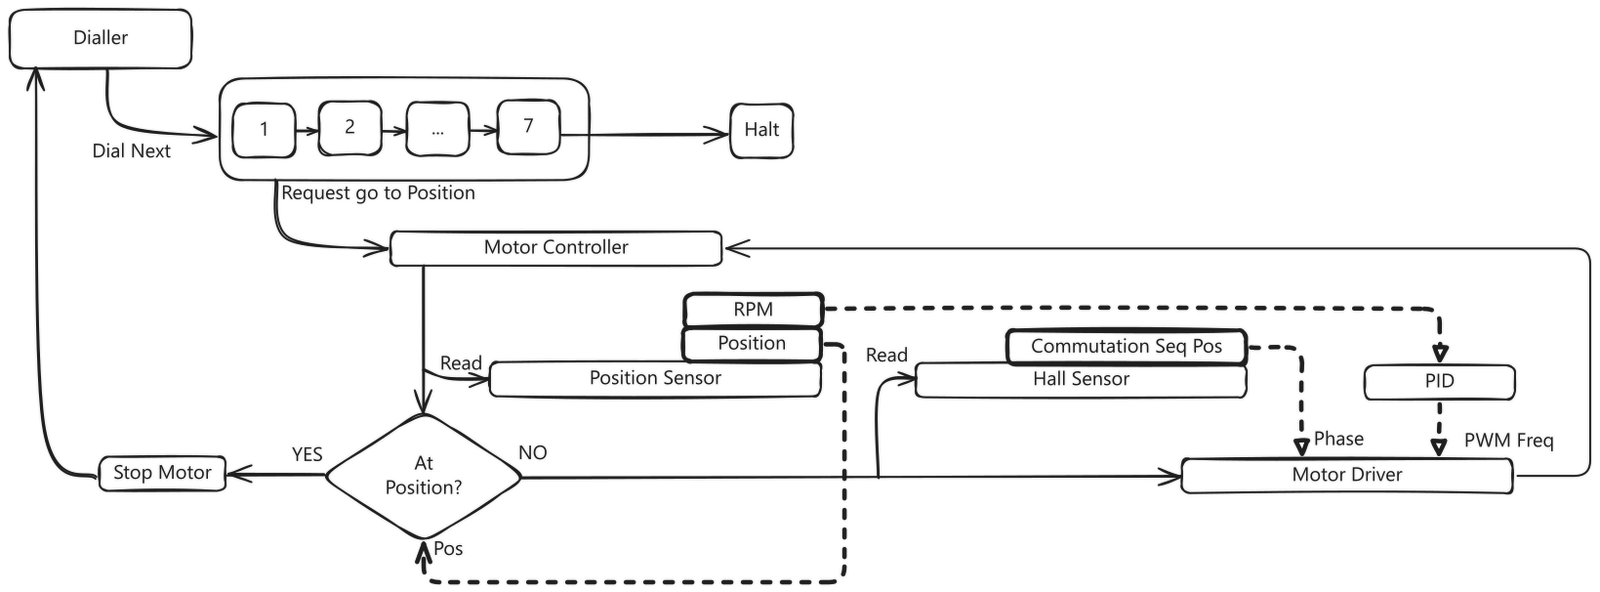
The dialler iterates through its address, where each symbol corresponds to a position, and asks the motor controller to seek to that position. Repeat seven times.
The motor controller reads two different sensors: the hall sensors, which are used to calculate the commutation sequence position, i.e. which phase needs powering to continue fluid motion (1 to 6); and the quadrature sensor, which measures the change in angular position and is used for the relative position and the RPM.
The RPM is passed into a PID calculation, which adjusts the PWM effort applied to the motor to hold the setpoint speed (a constant).
Commutation
Commutation is the sequencing of the coils to ensure the motor is always driven. My commutation driver consists of the hall sense circuit, i.e. 3 hall effect sensors 120 degrees out of phase with each other. There are six states, used to set the currently active winding depending on the direction.
During the early phase of the project I heavily referenced Electronoobs’ sensored ESC project for the electronics, and this commutation guide for the code.
In my implementation I have two lookup tables for hall sensor state to windings, one table for each spin direction. These are as follows. (In my notation, Winding_AB means Winding_SinkSource, i.e. connect A to ground and B to VDD.)
// Declare Valid Hall States.
Motor.BindClockwiseWinding(State_101, Winding_BA);
Motor.BindClockwiseWinding(State_100, Winding_CA);
Motor.BindClockwiseWinding(State_110, Winding_CB);
Motor.BindClockwiseWinding(State_010, Winding_AB);
Motor.BindClockwiseWinding(State_011, Winding_AC);
Motor.BindClockwiseWinding(State_001, Winding_BC);

//Anti-Clockwise; Hall State & Winding Response.
Motor.BindAntiClockwiseWinding(State_101, Winding_AB);
Motor.BindAntiClockwiseWinding(State_100, Winding_AC);
Motor.BindAntiClockwiseWinding(State_110, Winding_BC);
Motor.BindAntiClockwiseWinding(State_010, Winding_BA);
Motor.BindAntiClockwiseWinding(State_011, Winding_CA);
Motor.BindAntiClockwiseWinding(State_001, Winding_CB);
When a state change is detected, the new active winding is cached, and drive is called: this shuts down all windings, then activates the new winding pair. A change to the PWM effort from the PID controller can also force the windings to be re-evaluated with the new PWM value.
A minor note on moving from the Nano to the Pico:
I needed to add a daughter board with an op-amp to get clean voltage thresholds. The previous circuit was just a voltage divider, giving roughly half the supply voltage as the low level. On the Nano this was below the high threshold, but on the v4 I was getting 1.6V for the no-magnet state, which is above the Pico’s rather low 1.3V high threshold. I fixed this in v4.3 by bringing the op-amp onto the board, eliminating this board.
Speed Control
With a brushed DC motor, speed control is easy. More voltage is more current across the coils, which induces a stronger magnetic field, which means stronger attraction and thus faster rotation. Less voltage, the opposite.
With a brushless DC motor, less voltage probably just means your ESC MOSFETs don’t turn on, and the thing does precisely nothing. PWM (pulse width modulation) is the common way of tackling this in digital circuits: chopping the signal into periods of ON and OFF, and varying the ratio of on to off (the duty cycle) so that the average voltage is reduced.
I did try a constant PWM approach, but at any constant PWM value the motor has some degree of acceleration and eventually reaches full speed. I needed a dynamic system that could respond to the actual speed. Enter PID.
PID
Proportional, Integral, Derivative (PID) is a common control algorithm for keeping a system at a setpoint. It works on active feedback, taking the deviation from the target on each cycle and weighting the three P, I, D factors to generate a new control input, the output PWM value in this case, with the goal of converging the error to 0.
- Proportional - responds to the current error; the bigger the gap, the harder it pushes to close it..
- Integral - accumulates error over time, so it keeps pushing until any lingering gap (the steady-state error) is gone. Too much of it causes overshoot.
- Derivative - responds to how quickly the error is changing, braking the approach to reduce overshoot and oscillation (damping).
I initially implemented my PID controller on the v2 before I took a break from the project in 2023. It never really worked reliably on that platform. On the v4, however, it mostly worked out of the box.
I do currently have issues with the D term, which has a habit of violent overreaction, especially when starting up or nearing the target. The D term is delta error / delta time, and as dt is minuscule, it tends to be disproportionately large given the output range is only 0-255.
I’m not completely sure how to solve this yet. A tiny D constant seems to help, as does increasing the sample time for measuring speed, e.g. it’s very unstable at 0.025 seconds, but fairly okay at 0.05 seconds. I’m sure there’s a balance to be struck, given how coarse the reading is at low speeds: even a single position sensor tick can make a large difference to the calculated speed. Earlier revisions used a rolling average, but that may just harm the responsiveness of the system. For now it’s good enough, but I need to revisit this.
Stupid
One notable ‘fun’ mistake I made a few years ago now was particularly painful when I finally realised. It may be the stupidest self-inflicted software performance bug I’ve ever caused, simply because it took the better part of a year to figure out. For context, compared to the original ESC, I completely rewrote the software, so this got lost in that. One of the things I added was a quick debug readout on a 20x4 LCD. Yeah, turns out I2C is very slow. Writing a letter to that thing takes 40μs. It would appear doing a full debug dump in the main loop every cycle wasn’t wise.
The failure mode was insidious: it would complete a few rotations before entering oscillating motion. It was leaving the phases active longer than it should. I only noticed this once I got an oscilloscope, where the signalling length inconsistency was as clear as day. Before that, I’d wrongly assumed it was a detection issue with the hall sense board, and must have redesigned that thing ten times in the process. Since I only really work on this project at weekends, this killed all the early momentum.
Position Control
The Stargate needs to be able to move any of the 39 glyphs to the top position. This problem splits into two parts: knowing the position of the ring, and being able to stop rotation at an exact position.
Overthinking this caused me one of the biggest headaches of the entire project. At the top of the original Motor One post there is this statement of intent.
The primary objective of Motor One is to construct a to-project-final-scale BLDC type motor which has the following functions, spin direction control, variable speed control to slow RPMs and precise positional control.
I should have written this in bold across the wall of my workshop. I convinced myself the requirement here was for an absolute encoder. Mostly because I thought it would be cool for it to not need a homing sequence. This is bloody difficult to do, and I didn’t manage it. I then tried a few incremental encoder types before settling on a quadrature encoder, which works well.
Absolute Encoder via Gray’s Code
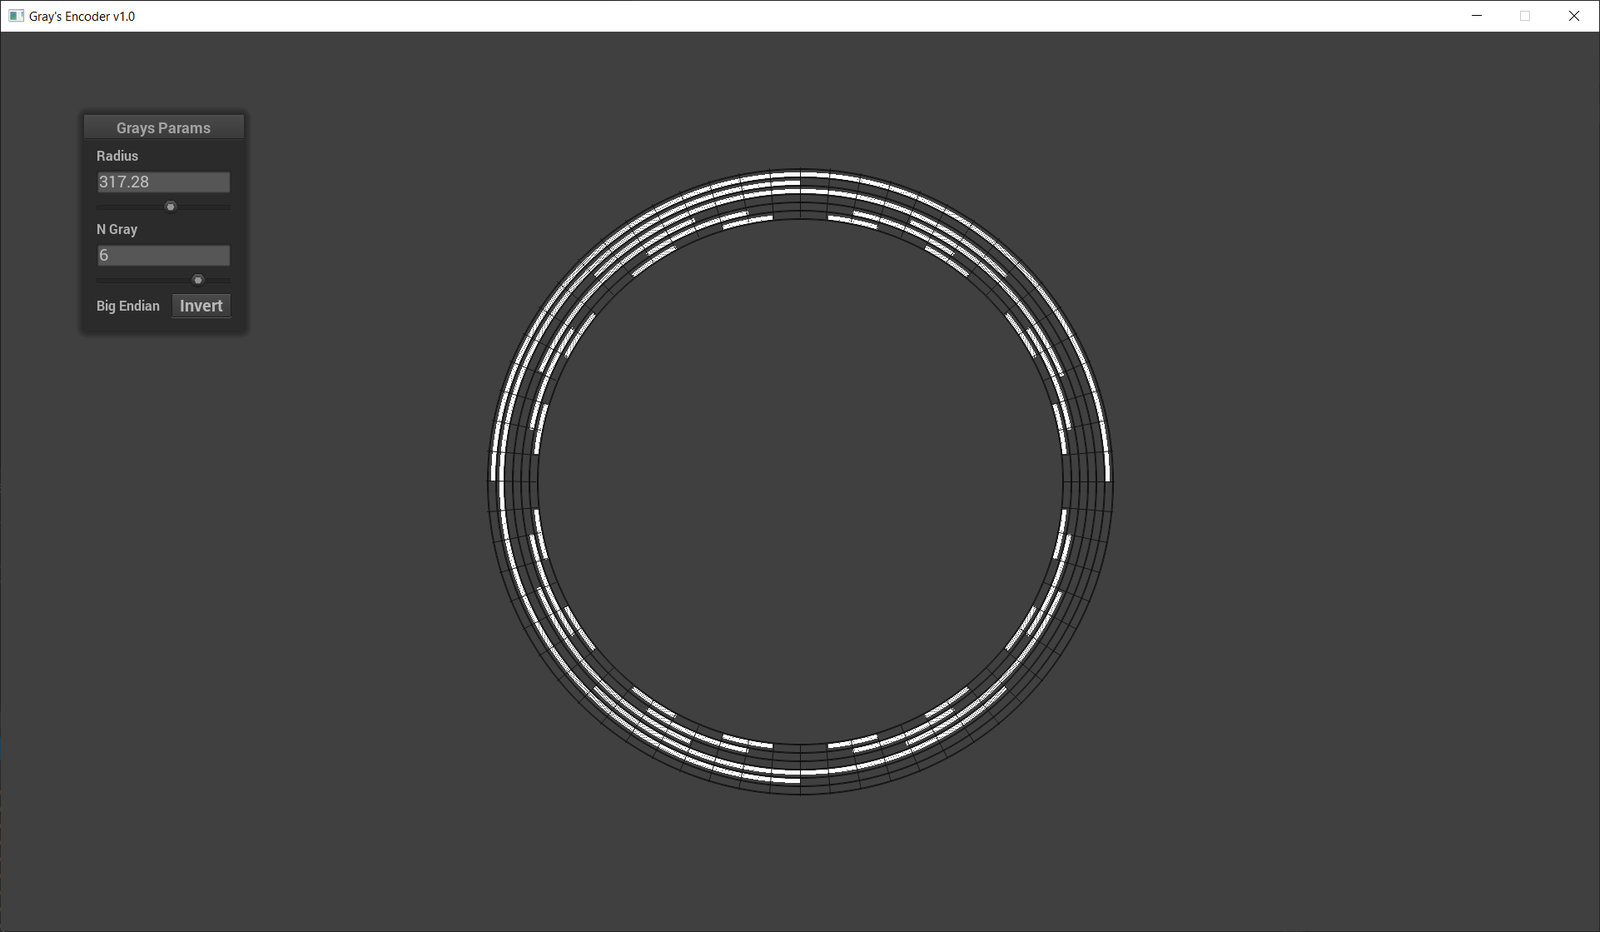
An absolute encoder is an encoder which retains knowledge of its position without power. Gray code is one method of achieving this, where every step of the encoder’s resolution has a unique code, physically rendered onto a code ring as a reflected binary pattern. At any given instant it can read this code to know its position.
Gray code in particular also has innate error detection properties, as each code will be exactly 1 bit different from its neighbour, so if that isn’t the case you’d know you have a bad read. I made a program to generate these patterns, which ideally I’d have printed onto a disc for the sensor to read.
I used an S9227-03 linear image CMOS sensor from Hamamatsu Photonics in an attempt to read the code, but couldn’t get it to read any of my test patterns. The only success was during a test where I backlit a 2.54mm pin header with a torch, getting the expected waveform on my oscilloscope. Turns out this sensor, which is clearly marketed for spectroscopy, needs the target to be self-illuminating.
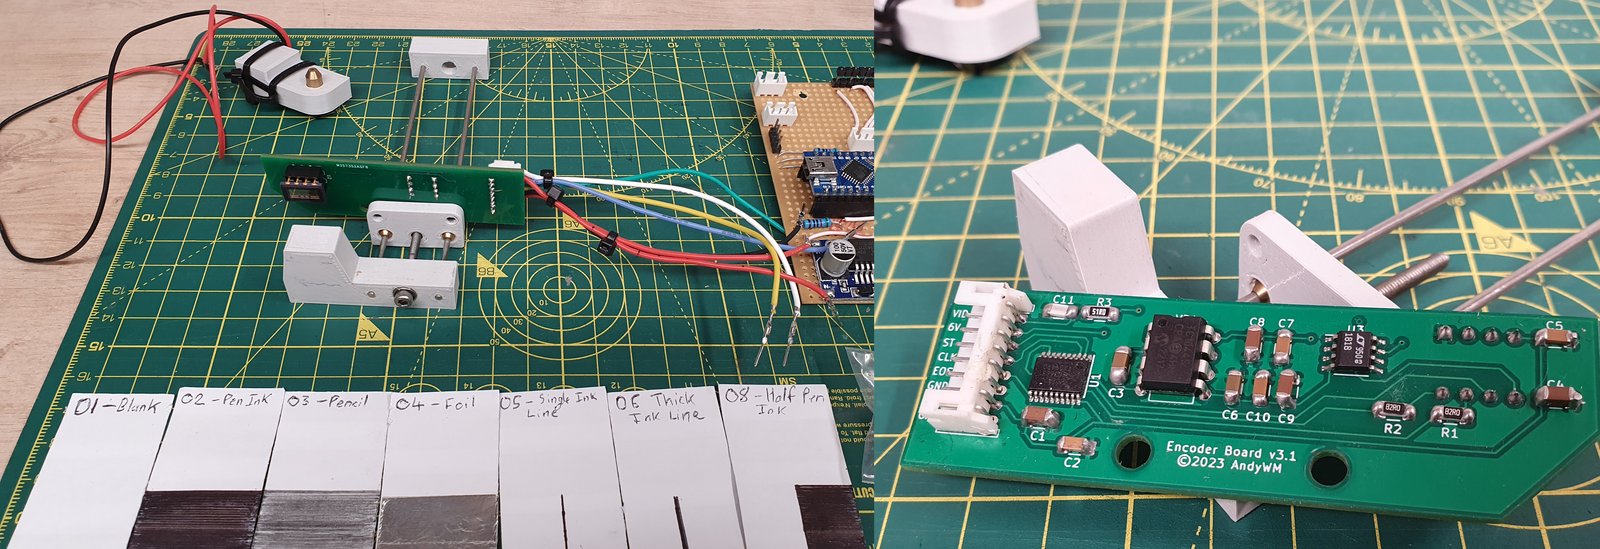
A possible solution suggested to me by an engineer from Hamamatsu was to have a phosphorescent target which emits in the wavelength range the sensor detects, but is excited by one it doesn’t. It did finally highlight the bigger problem, though: why exactly was I even trying to do it this way? It’s wholly unnecessary.
I had convinced myself it was a requirement. The primary advantage of this kind of encoder is you don’t need a homing sequence, which I thought would look a tad naff. The engineer pointed out I could probably just hide the initial homing as part of a first random rotation, or lock the rotor and store the last position in an EEPROM if absolutely necessary. Honestly the first random rotation would be fine.
I think there’s a lesson in target fixation in here somewhere. I at least had fun making the driver circuit, interpreting the sensor’s datasheet to write the driver code, and making my first practical SMD PCB. But this approach is a complete dead end. It also showed me the difference simply talking to someone makes when problem solving, rather than keeping everything in your own head.
Incremental Encoder - Quadrature
An incremental encoder is a type of relative encoder. It tracks the difference in position from its initial position, but doesn’t have any actual understanding of where that initial position is in absolute terms. Once power is lost, wherever it happens to lie becomes the new zero position. To get an actual non-relative zero position you perform a homing sequence, which is to say you have some other sensor which only triggers when the rotor is at your true zero position.
I have tried a few sensors here, initially a few variations on an optical photo-interrupt sensor, like the one pictured below.
Then finally the S4506, a neat little quadrature sensor, also from Hamamatsu. The quadrature package is simply the right choice here. Those optical endstops might be okay for coarse positioning, but they’re not really suitable for this problem otherwise. You also really need the ability to tell direction.
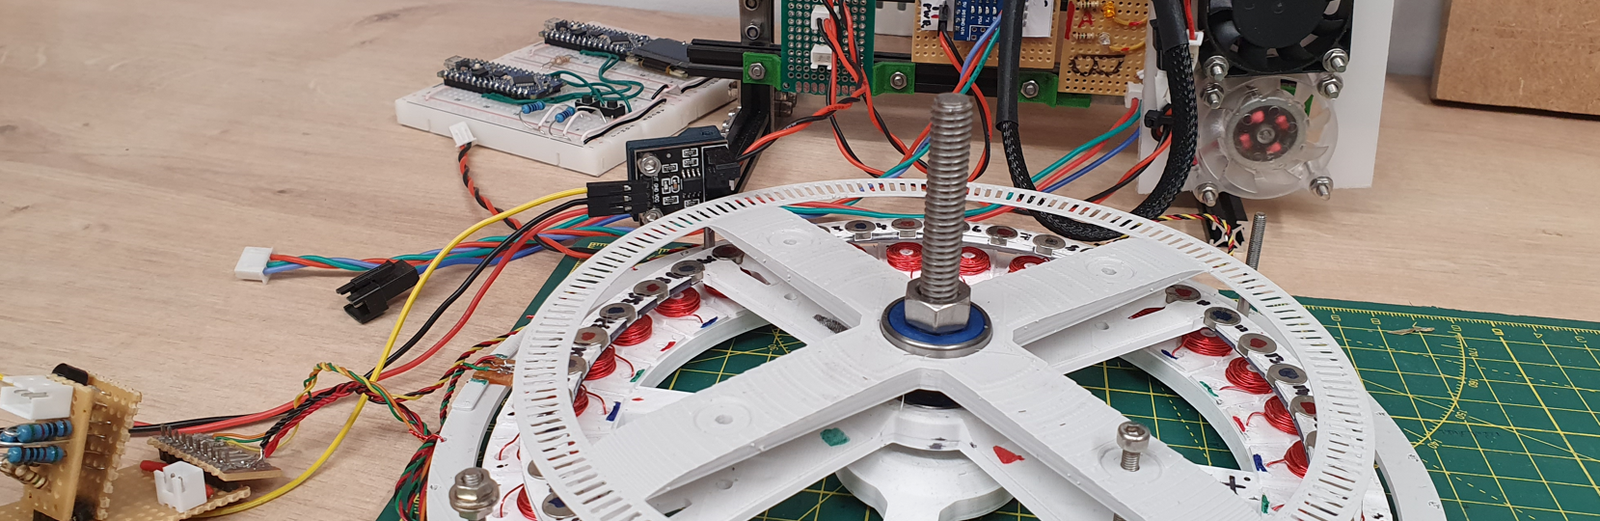
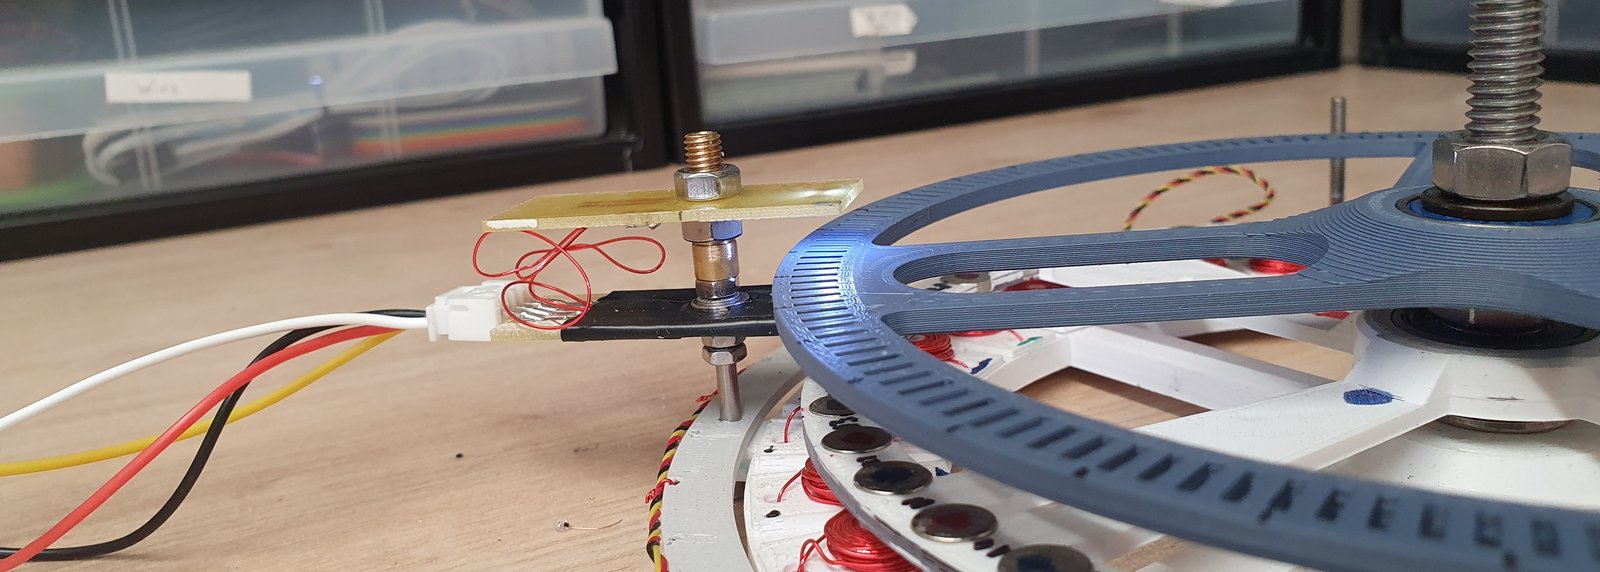
While both use slotted discs, with an illumination source opposite a photo sensor, the photo sensors are quite different. The S4506 has 4 light sensitive zones, some onboard comparators, and outputs two logic signals which can be decoded and used to determine direction (datasheet).
I did initially have problems with the S4506. One was simply that my original 180-segment code ring was out of spec: the datasheet asks for a 1.56mm centre-to-centre slot pitch, which works out at about 162 slots.
The second problem was my software implementation for the signal processing. I tried just using interrupts, but ended up missing ticks. The Pico came to the rescue here, specifically PIO (programmable I/O): dedicated, simple I/O processors that can offload the handling of hardware protocols. I did have a go at writing my own. You write these in a very simplified assembly language with nine instructions, where you end up doing weird things like using JMP with its compare argument when you want arithmetic. Fortunately for me, while going over Raspberry Pi’s docs I found this example.
It’s precisely what I needed, and it “just worked”. People are damn clever: this thing implements a state machine by calculating the program counter directly off the input. How do you even think of solutions like that?
Mechanical
Not a lot has actually changed here mechanically since the original. It has become readily apparent, as this project has dragged on, that plastic is an awful material to make a rotor out of; mine is now extremely distorted. It took me an embarrassing amount of time to realise how much internal stress those 40 alternating-polarity, 1kg-pull neodymium magnets pressed into the rotor would cause.
Future iteration should be be metal. Speaking of which, since the original prototype I have acquired a CNC machine, a mini lathe and a manual mill, which opens up more interesting options.
Bearings? I did write up a post on my bearing experiments in June 2022, I will have published that in conjunction with this post. The conclusion I came to was pre-machine tools: that I should try rollers, likely off-the-shelf flanged bearings, to seat the rotor into. That conclusion doesn’t stand, in reality I will need a custom thin-section bearing, I had PCBWay CNC me one out of stainless steel, after trying to make that myself in my workshop. Which I still get the odd metal splinter from years later… Let’s just say this still requires more R&D.
BLDC vs Stepper Motors - An Aside
This is a difficult question considering the time invested. Am I even building the right thing?
A stepper motor is a subclass of BLDC, and is the kind of motor generally used for precise control systems; e.g. robotics, 3D printers, etc. I did consider steppers when I first started, but out of ignorance thought them the more complicated option, so I built my axial-gap 3-phase BLDC, which in reality was the more complicated choice.
The main advantage of a stepper motor is that precision control is inherent to how they work. I wouldn’t need a closed-loop encoder to track position: provided the motor doesn’t stall, your position is the number of steps you have commanded the motor to move.
Electrical Differences
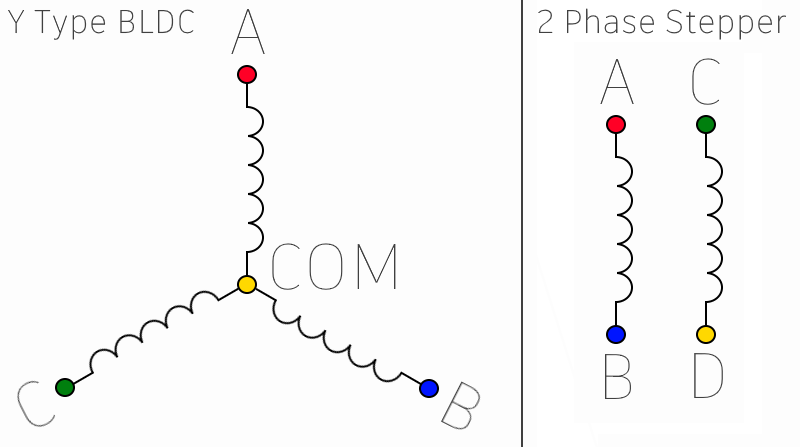
The most common type of BLDC motor has three phases, i.e. three groups of electromagnets, connected in a Y configuration, i.e. sharing a common junction. Because of this common junction, two phases must be in use for the motor to do anything. Which two, and what they’re doing, is controlled in software on the ESC, which uses MOSFETs to connect one end to ground and the other to the supply voltage. The sequencing is relatively complex, and needs extra hardware, such as hall sensors or circuitry to detect back-EMF on the unused coil.
A hybrid bipolar stepper motor has 2 completely independent phases which can be used in conjunction with each other to give very precise control over a ‘step’. For example, they can be used in full-step mode, where only one phase is used, pulling the rotor over by 1 ‘slot’, or, more commonly, microstepping: a fractional step mode where they work together in a kind of tug of war to move it some fractional distance between slots.
An aside on stepper drivers. Until I worked on the encoder test rig recently, I’d never actually dealt with these directly. Turns out… they’re really simple to use, and pretty neat commodity ICs. As far as I can tell, provided I was within the current limits, if I went the stepper route I could practically replace the entire ESC with a single stepper IC, e.g. an A4988 or a more modern driver like a TMC2130. The IC has internal MOSFETs for both phases and presents a really simple interface to the microcontroller: enable, direction and step, plus a way to set the microstep mode. All the complex timing is handled on-chip.
The microstepping itself is pretty clever: the chip produces out-of-phase sine wave approximations on both phases, resulting in a smooth transition between slots.
Physical Differences
Superficially the two are similar. Electromagnet coils for slots on the stator, permanent magnet poles on the rotor. The difference is in the number of slots and poles. Motor One has 30 slots, meaning if you track one of the 40 magnets around a complete revolution, fully energising the coils in sequence, it will move into 30 stable positions: a coarse resolution of 12 degrees. A typical stepper used in a 3D printer has 200 or 400 slots, for a coarse resolution of 1.8 or 0.9 degrees. If you’ve ever tuned steps on a 3D printer, this is where the 200/400 steps per rev thing comes from.
The way they accomplish this is the noteworthy thing: you can’t just multiply the number of coils and magnets, as they’d be too absurdly small to even function. If you look inside one, they look like gears. They have multiple “teeth” per electrical coil, or magnet. Each prominence works as if it were its own mini magnet.
The other effect of increasing the pole count is to reduce your max speed, along with other characteristics like torque and acceleration. Though that reads like a list of things I’m trying to reduce anyway…
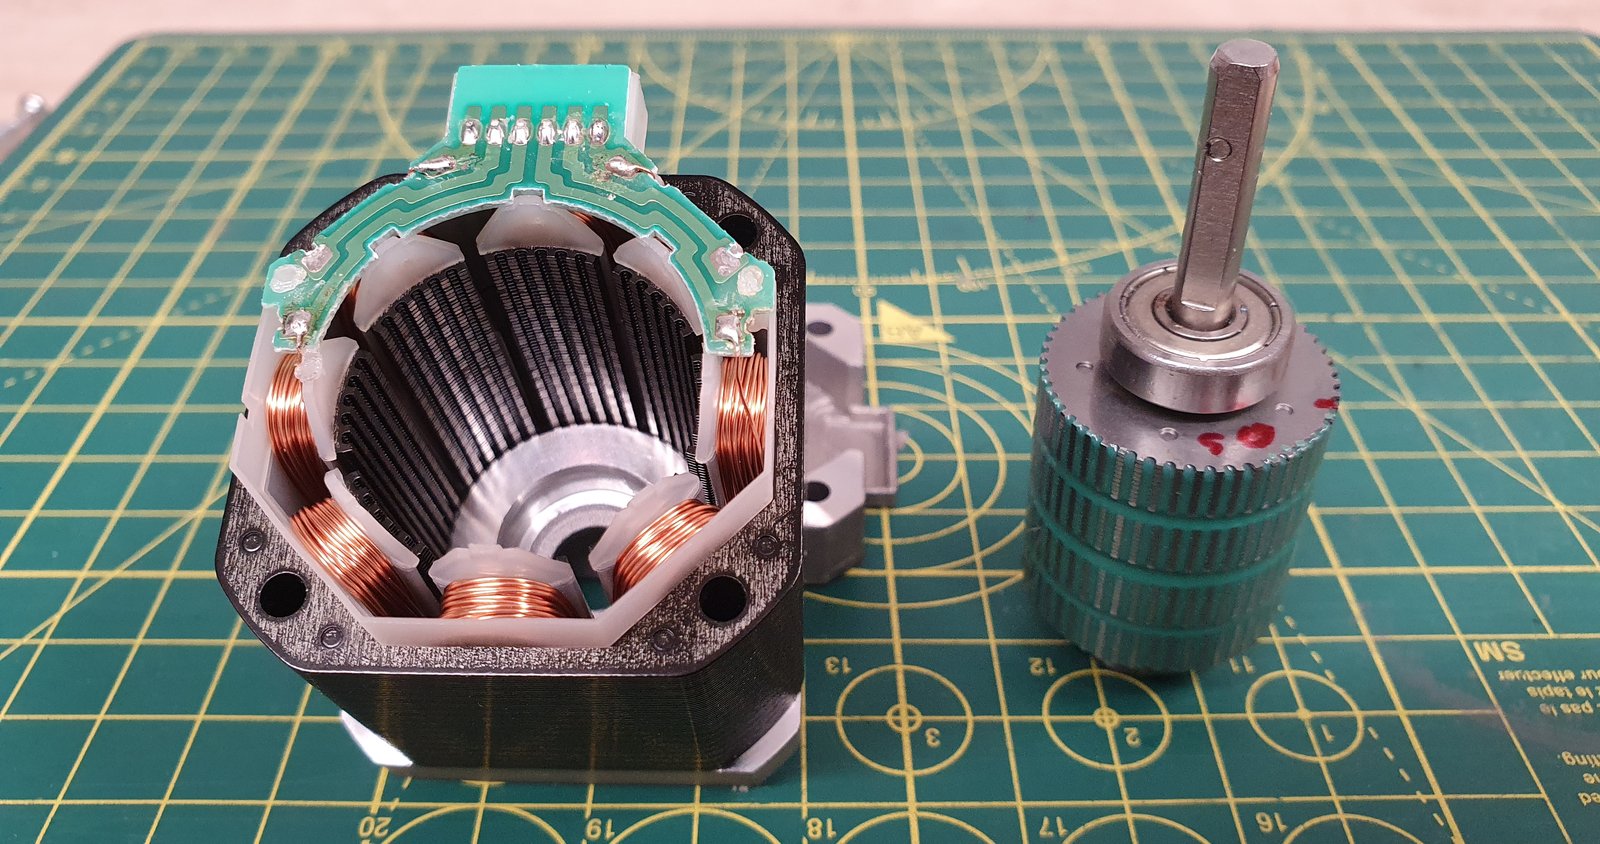
A note here for completeness’ sake, since it took me a minute to understand. The pictured motor is a 200 step motor. The actual term for these ‘gears’ is cups. At first glance it looks like this has 4 cups, but they’re actually in pairs as far as alignment goes, so it actually has 2 cups. If you count the teeth you get 50 per cup, 100 unique teeth positions. That seems like it should produce a 3.6 degree angle, not 1.8. That’s not how it works, though. The actual formula for the step angle is:
Step Angle = 360 / (Rotor Cup Teeth Count * Number of Phases * Number of Pole-Pairs)
- Rotor cup teeth - how many teeth per cup: 50.
- Number of phases - how many electrical phases the motor has: 2.
- Number of pole pairs - how many poles on the stator have their teeth fully aligned with the teeth on the rotor when it steps: 2 for this motor.
- 360 / (50 * 2 * 2) = 1.8. Or just 50 * 2 * 2 = 200 steps per rev.
Comparing
Electronically, steppers are simpler, especially if you can just buy an IC that does all the hard bits for you.
Mechanically, however, they’re more complicated. Motor One already has a lot of slots for a BLDC, a natural consequence of it being an awkward, large-diameter, disc-shaped motor. I don’t think I can practically increase the number of magnets and coils by that much, as their strength drops to a quarter for every halving in size.
If I did want to make a stepper motor, I would have to make the intricate gear-like structure, which would have to be machined out of a ferromagnetic metal like steel. I could never have done that when I started this project, but I’ve taken up machining as a hobby since. It would likely be doable now. I would probably need to revisit the axial arrangement.
That said, there’s no reason a BLDC can’t do what I need it to. With the addition of a closed loop position sensor, it will work just as well. It’s just required a lot more development. A stepper motor was probably the correct choice for this application. I may be able to get some of the benefits by increasing the number of magnets and poles while keeping it a BLDC. I know I said this is problematic, but the motor can currently get up to about 400 RPM if you let it go full tilt. There may still be some performance I can sacrifice here…
What’s Left, What’s Next?
Motor One
I’ve largely neglected this part of the project in the last couple of years. I have an in-progress refactor of the ESC code to flesh out the dialler into something more akin to what will actually be needed, stubbing out the functionality for the lights, chevron lock, and audio.
I’ve run this software on the latest ESC, in a spin test mode like back in 2021, and it does work.
The last key element of Motor One from the original plan was a milestone for developing a custom rotor bearing. I tested one on Motor One, and it did spin up. I don’t think that version of the bearing is what I’ll proceed with, but that it worked at all is encouraging.
The v4.3 board has a regression: it omits some important pull-downs for the MOSFET driver. Dead short. I’ve bodged this on the board I built, and I don’t have enough new features to justify ordering a new revision just yet. This board is likely what I’ll continue with for the next motor.
But I think Motor One itself, as a research platform, is EOL.
Motor Two?
I’ve already started designing Motor Two. Initially I wanted it to follow the Stargate’s size constraints more closely than Motor One, and when I tried, I immediately rediscovered some of those constraints: 4mm (0.23kg pull) magnets. I think I should stick with them, but I’d like this platform to be engineered in a way that actually lets me tinker.
As far as the ESC goes. The speed control algorithm currently uses random PID values, and it’s not quite as stable as I’d like. I want to refine this. Possibly with automated tuning, e.g. the Ziegler–Nichols method? The position itself may benefit from its own PID controller, or at least something to account for inertia. Alternatively, since first writing this post I’ve learned about something called field-oriented control (FOC). It needs more sensing in the electronics and is a more complex control algorithm, but in a world with AI now, it’s probably worth looking at. It’s how precision devices such as servo drives are typically run.
If Motor One was the “Fundamentals Pathfinder”, Motor Two will be the “Refinement Prototype”: taking the lessons and general design of the first and building a better one.
Main Goals:
- Assembly thickness. The pathfinder is an inch thick; the target is 1cm or less.
- Custom Bearing. The rotor assembly must have an appropriate integrated bearing.
- Easily Adjustable Coils. This likely runs at odds with the assembly thickness, but the coils are a major part of the thickness, and this will likely take many iterations to get right. These can’t be soldered to the bus bars like in Motor One.
- Easily swappable rotor assembly. This is already the case with Motor One, but I’m stating it as a goal for Motor Two as the custom bearing may cause some complications.
As a likely consequence of these, I expect Motor Two to be an all-metal construction.
Secondary goals:
- Electronics miniaturisation.
- Tune performance characteristics. It may be possible to get more favourable low speed performance with a different coil/magnet count. If we make things easily swappable, it may be a good opportunity to experiment.
Motor Three???
‘Proof of Concept’, this is a little way off. This will be taking whatever comes out of Motor Two, and making it fit into the form factor of a Stargate. There’s a possibility this ends up just becoming the gate prototype.